1. Prepare the Packaging Machine
To sequence with App-V, a clean Windows machine must be used to avoid the application installer to skip files and registry keys already present on the machine.
One of the best practices for App-V sequencing is to sequence as much as possible on a virtual machine. .
The installation of the sequencer is delivered as a single executable. It can only be done on Windows 7 SP1 machine or higher.
Before installing the sequencer, check the 2 following prerequisites are installed:
- .Net Framework 4
- PowerShell 3.0
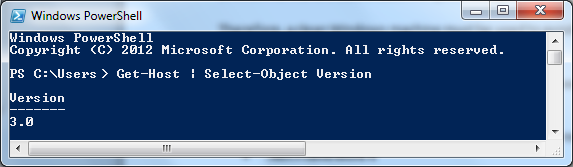
To check if Windows PowerShell 3.0 is already installed on the workstation:
- Click Start > All Programs > Accessories > Windows PowerShell > Windows PowerShell
- Run the following command : Get-Host | Select-Object Version
- Check the version
.
.
Windows PowerShell is included in the Windows Management Framework.
Windows Management Framework can be downloaded on the Microsoft Download Center.
Windows Management Framework can only be installed on Windows 7 Service Pack 1 or higher.
It cannot be installed on Windows 8, but is native on Windows 8.1
Windows Management Framework is also incompatible with some components.
For example, Windows Management Framework 3.0 is incompatible with:
- System Center 2012 Configuration Manager
- System Center Virtual Machine Manager
- Microsoft Exchange Server 2007 and Microsoft Exchange Server 2010
- Microsoft SharePoint 2010
- Windows Small Business Server 2008 and Windows Small Business Server 2011
Once the prerequisites installed, install the sequencer using the single executable provided by Microsoft.
.
.
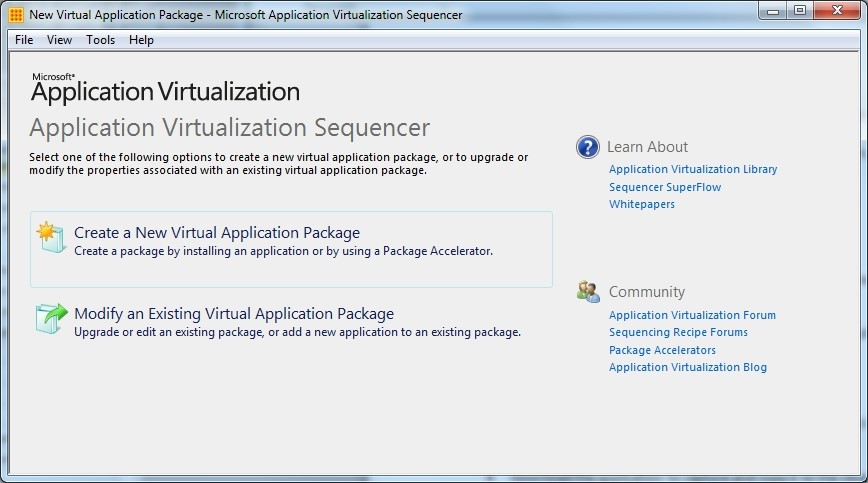
2. Create a New Virtual Application Package
Launch the sequencer:
C:\Program Files\Microsoft Application Virtualization\Sequencer\Sequencer.exe
![]()
The sequence wizard starts with the question/decision to start with a new package or modify an already existing package.
Select Create a New Virtual Application Package
.
.
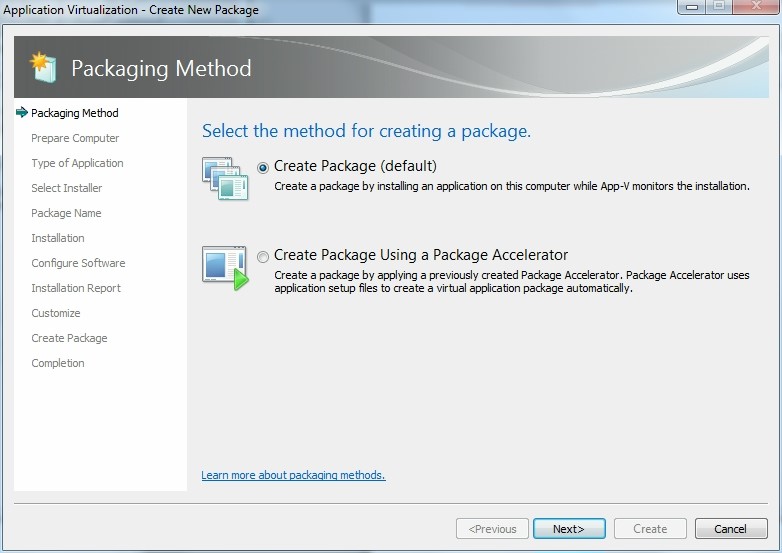
3. Packaging Method
After selecting to create a new package you need to define the package method.
The first possibility is called Create Package (Default).
With this option you execute all steps within the sequence wizard.
The second possibility is to use a Package Accelerator.
A Package Accelerator is a kind of recipe created by somebody else (for example a supplier or by the community). Using a Package Accelerator, all the steps are predefined and the package process is executed automatically. The success of the Package Accelerator is dependent on the suppliers that provide it and/or the community (including the reliability).
- Select Create Package (default)
- Click Next
.
.
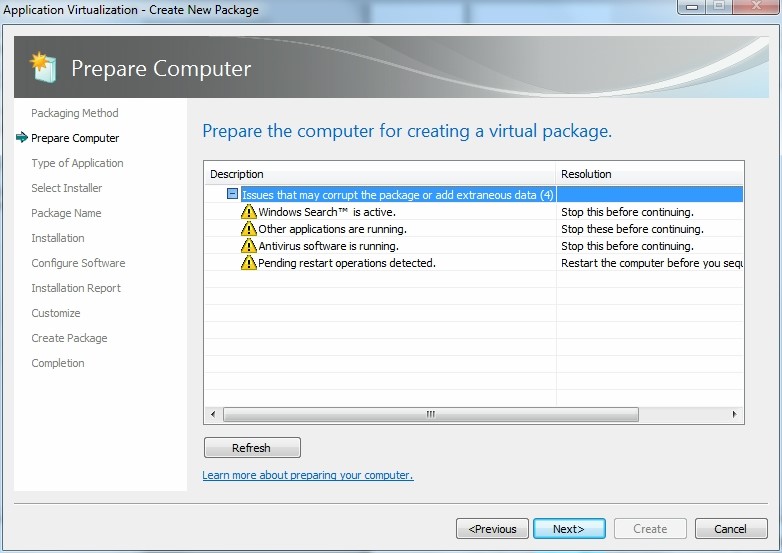
4. Prepare Computer
Next, the sequencer will check the machine and will provide feedback if there are conditions or processes available on the sequencer that can cause issues during sequencing.
- Before continue, ensure:
- Windows Search is not active
- None other application is running
- Antivirus software is not running
- No restart is pending
- Solve all issues that may corrupt the package
- Click Next
.
.
5. Type of Application
Selecting the type of application is the next step.
There are 3 options offered: Standard Application (Default), Add-On or Plug-in and Middleware.
You will select Add-on/Plug-in when you want to create several virtualized packages and want them to connect via Connection Groups. Think of a Plug-in for Excel that will not be used by all users or has a frequent update interval. This option can also be used to virtualize add-ons for locally installed applications like Internet Explorer.
Middleware will be selected if you want to sequence two or more applications in separated virtual packages that need to be connected via Connection Groups. With this option you will first sequence the application package of the software that will be used by the other software products. After that sequence you will continue creating the second Application Package.
For a regular package without Connection Groups (so a single virtual package) you select the Standard Application (Default).
- Select Standard Application (default)
- Click Next

.
.
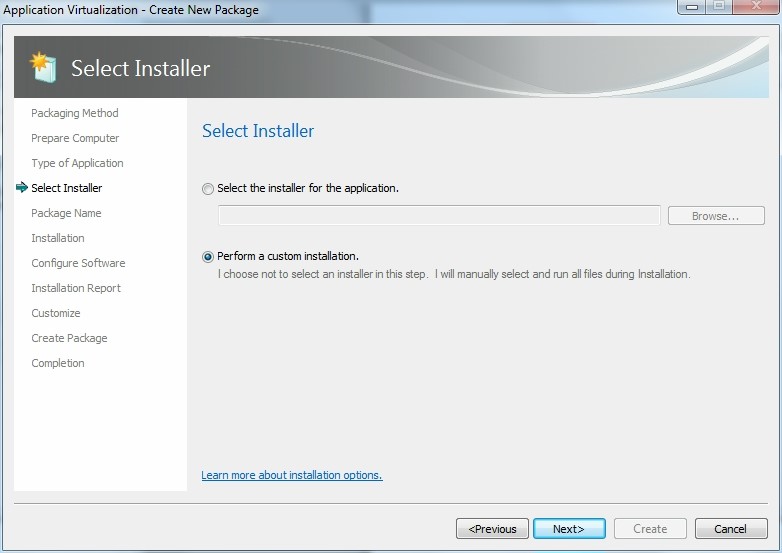
6. Select Installer
At the select installer window you really need to consider which option you would like to choose.
If the application installation is run using one file, then using the option “Select the installer for the application” can the best choice.
However, using “Perform a custom installation” give the possibility to execute the installation exactly as you would like.
- Select Perform a custom installation
- Click Next
.
.
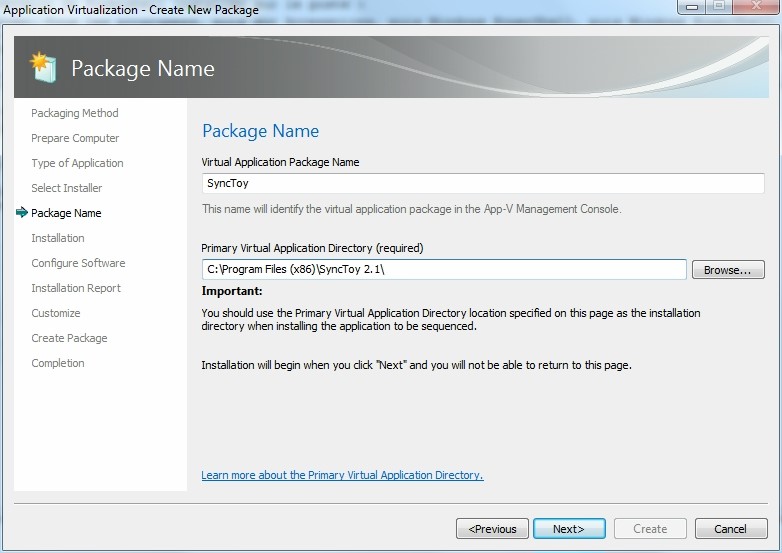
7. Package Name
After selecting the installer file or deciding to use a custom installation you need to provide a package name and the primary virtual application directory.
For example, we will consider the packaging of the application SyncToy.
The package name will be used as the name displayed within App-V Management Console.
The primary virtual application directory is the successor of the App-V (by default) Q drive. For those who used App-V before version 5 you need to install the application on a specific drive (by default Q). This is completely removed and the primary virtual application directory is being used for that. So, here you still provide where the application files will be installed during the recording phase.
Important: the primary virtual application directory must be the same than the installation directory specified during application installation.
- Specify the Package Name
- Specify the Primary Virtual Application Directory
- Click Next
.
.
8. Installation
Now you can execute the installation.
Just follow the installation steps of the application, but take into account several best practices like disabling auto updates and install all application components.
Also, don’t forget to install the application into the earlier provided primary virtual application directory.
- Install the application to package
- Check I am finished installing
- Click Next
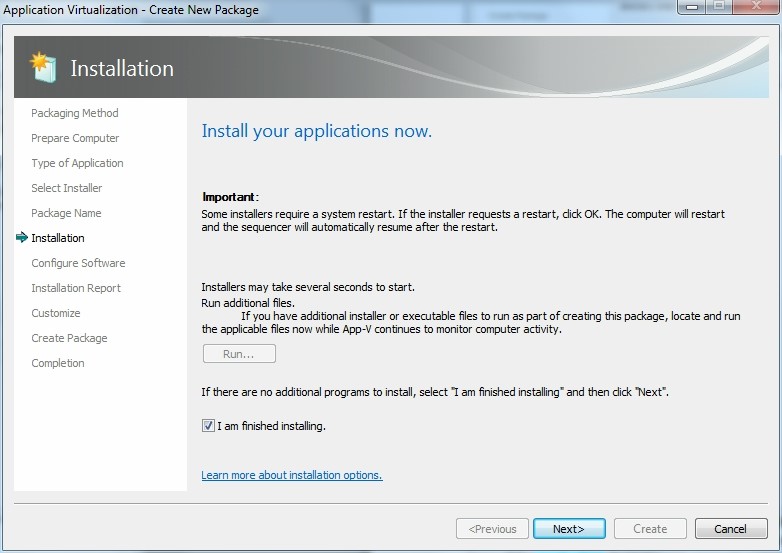
The system will capture the changes. Dependent on the size of the application and the package machine, this can take a while.
.
.
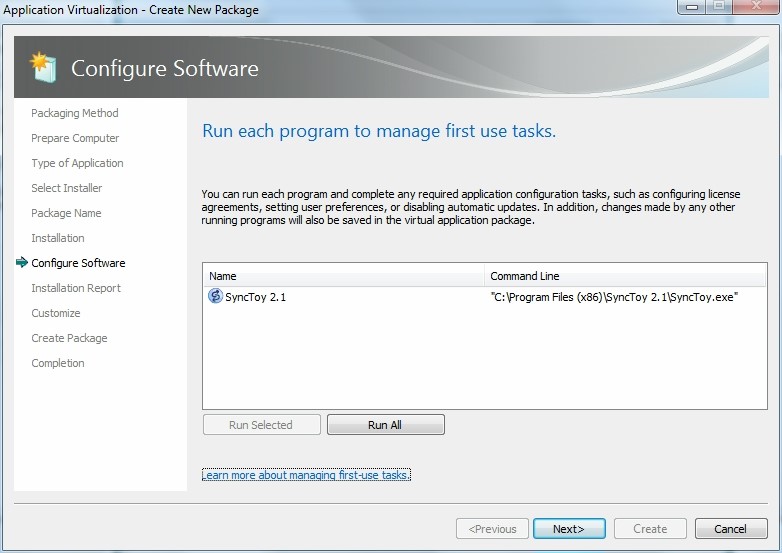
9. Configure Software
When the capturing is done you can start the application once during the Configure Software phase.
In this phase you can for example accept the license agreements or other first-run configuration settings.
- Run the installed application
- Apply configuratio
- Click Next
.
.
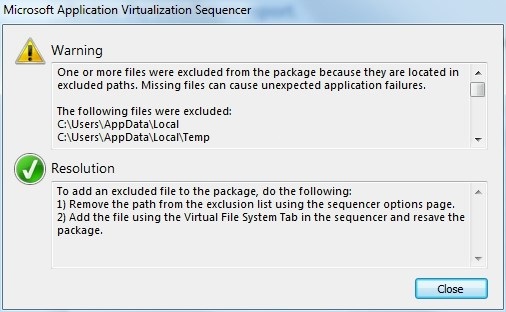
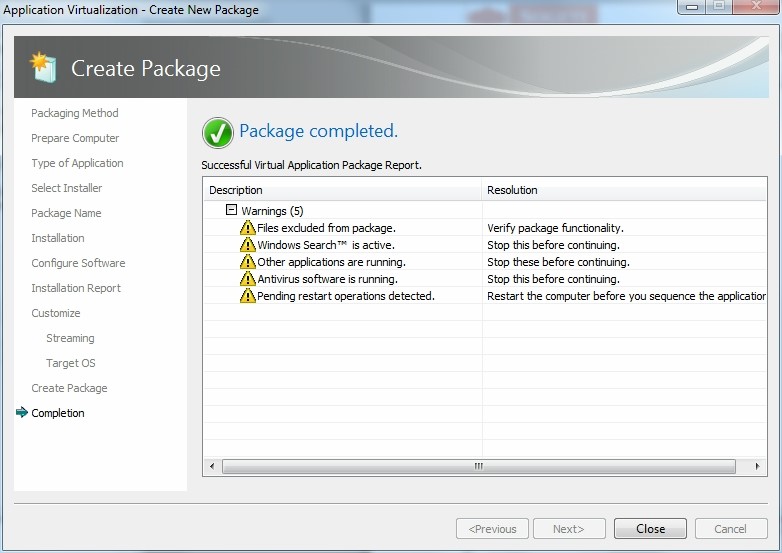
10. Installation Report
The sequencer shows the installation report where warnings and possible issues are shown.
Often this is about files placed in a location that is excluded in the recording process (ex: Temp folder).

Open the message to check if you have to do some customization after the sequence process.
Then click Next
.
.
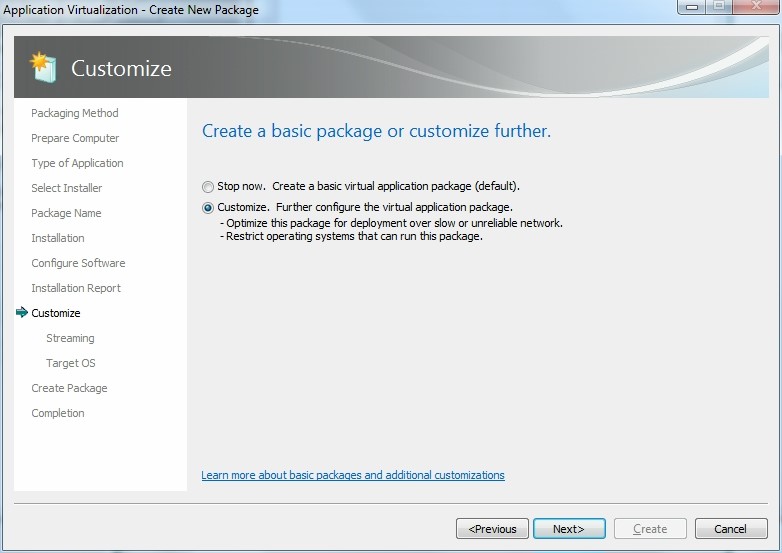
11. Customize
The virtualize package is now ready to compile. This can be done by selecting Stop Now, create a basic virtual application package (default). But it is advised to select Customize and have the possibility to go a bit more in-depth in the package.
- Select Customize
- Click Next
.
.
12. Prepare for Streaming
Launch the application and execute the most common tasks.
It allows preparing the package for streaming.
Then click Next

.
.
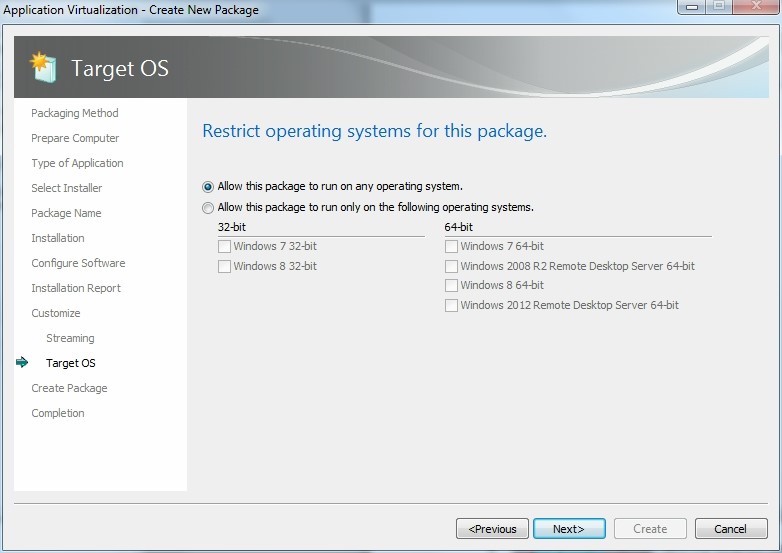
13. Target OS
You can restrict operating systems for the package.
- Select either “Allow this package to run on any operating system” or select the targeted operating systems.
- Click Next
.
.
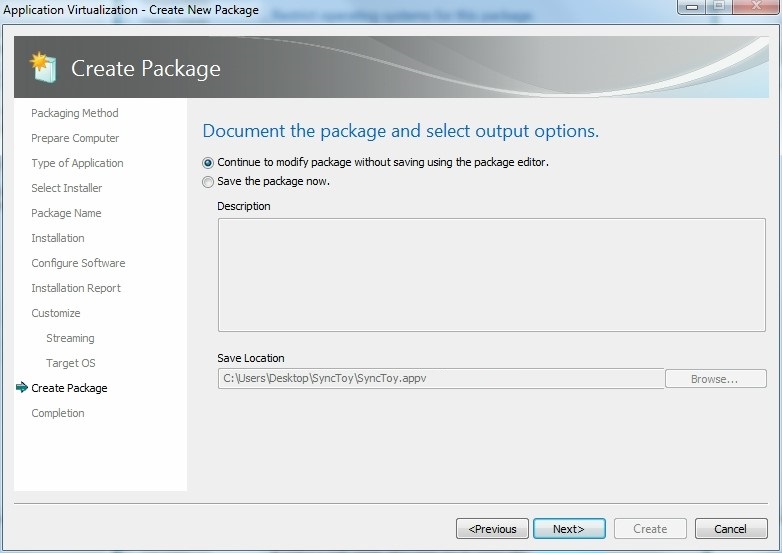
14. Create Package
There is an option to save the package and finish the sequence, or continue with modifying the package in another level.
- Select Continue to modify package without saving using the package editor
- Click Next
.
.
15. Completion
The package is now completed.
Click Close
.
.
16. Configuration using Package Editor
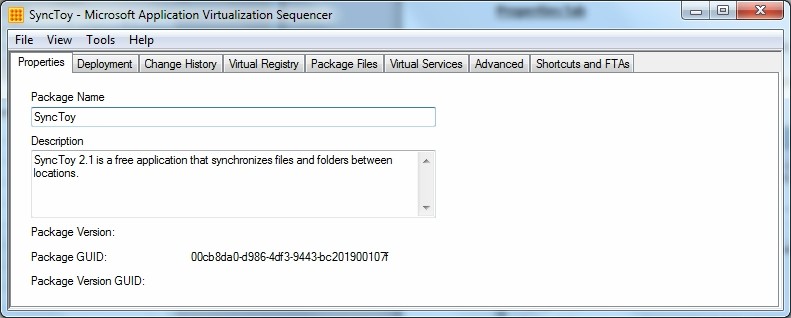
Once the package completed, the Package Editor starts.
Properties Tab
The package editor starts with the properties tab.
The Package Name will be shown in the App-V Management Console with the Description.
.
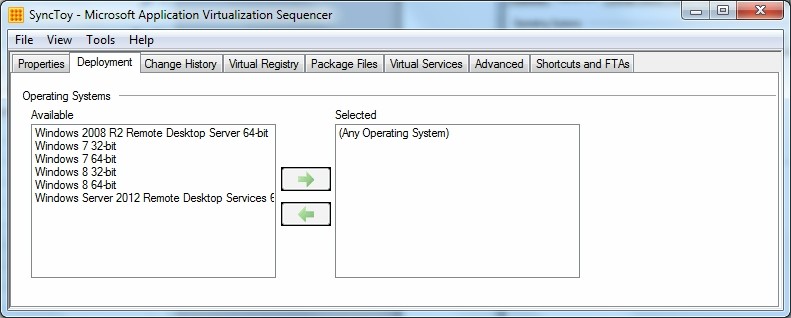
Deployment Tab
The second tab is called Deployment, on this tab you can (re)define the OS you would like to start the package on.
.
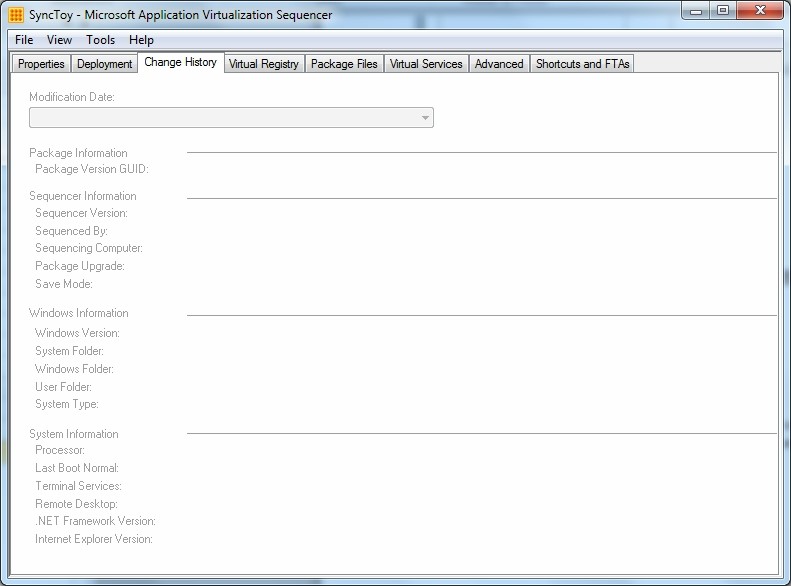
Change History Tab
On the change history tab information will be displayed when a sequence has been upgraded.
.
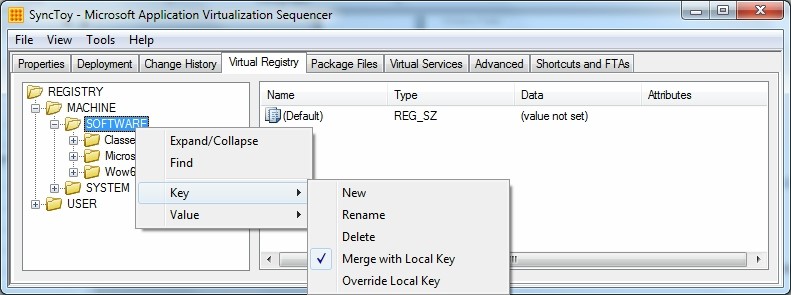
Virtual Registry Tab
This tab shows the registry keys and values which were added or adjusted during the recording phase.
It’s important to walk-through these keys and check for deleting potential pollution. Merge with local keys or override the local key. It depends on the application as to which configuration setting is right.
.
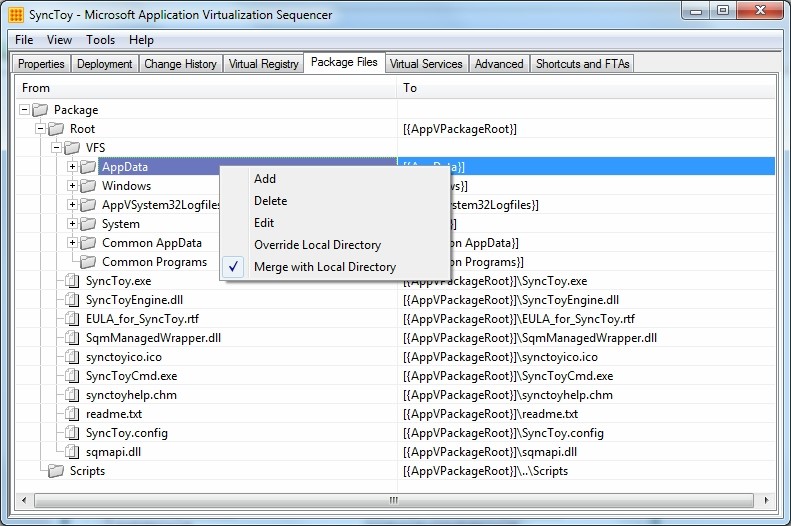
Package Files Tab
The Package Files tab offers comparable functionality as the Virtual Registry tab.
Instead of registry keys and values it shows the files recorded during the packaging process.
Again you can add or delete files and if the folder should be merged with the local system or the folder in the sequences should override the local directory.
.
Virtual Services Tab
The Virtual Services tab allows modifying the properties of detected services during the sequencing steps. Normally you would only see services shown there if the application installation creates a service.
.
Advanced Tab
The advanced tab shows two configuration settings:
- Allow all named object to interact with the local system
- Allow all COM object to interact with the local system. These settings are only necessary in specific cases, so don’t enable these by default.
.
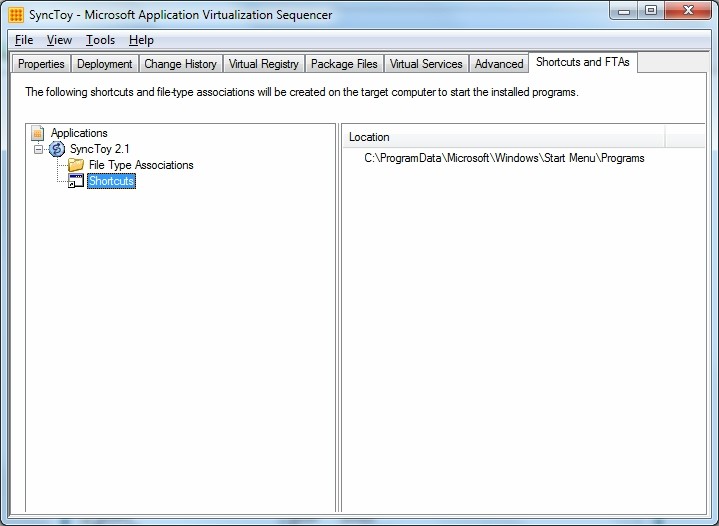
Shortcuts and FTAs Tab
When using the management infrastructure this information is used to display the shortcut on the client and connect the File Type Association(s) to the virtualized package.
You can edit, remove or add File Type Association(s) and the same actions are available for the shortcuts.
.
.
17. Save the Package
Once configuration is completed, save the package by clicking File > Save
The package is created and can be deployed.
.
.
18. Updates
Over time an application can have updates/hotfixes, additional functionality will be added or adjustments need to be made.
To update an application you arrange a clean sequencer machine again (revert the snapshot) and copy the package to the sequencer machine.
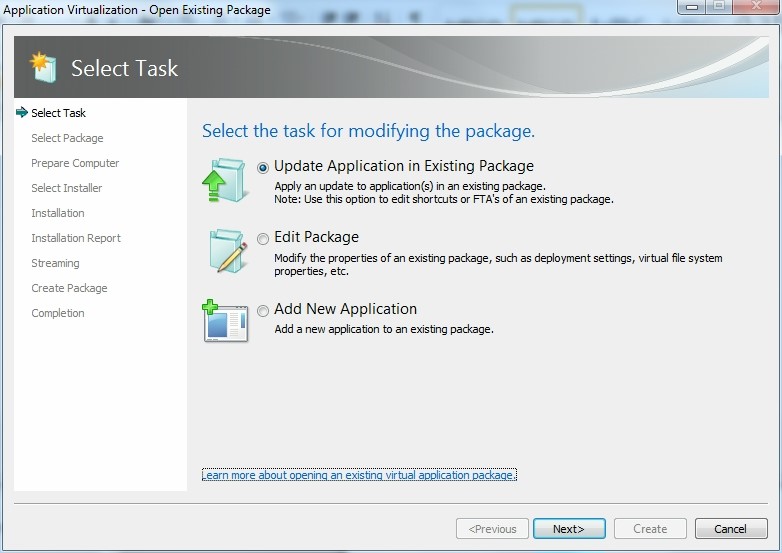
You start the sequencer software and select the option Modify an Existing Virtual Package.
.
Update Application in Existing Package
You will use this option if the application needs to upgrade to a new minor version or hotfixes/updates need to be applied. After selecting these options, similar steps need to be followed as when creating a normal package. First you need to select the package that needs to be upgraded and then the same steps are shown as a new sequence. You select the installer or choose custom installation, execute the required installation steps and the sequencer will record the changes on file/registry level.
.
Edit Package
This second option can be used to make small adjustments to the package as this option opens the Package Editor directly. So you can make modification changes as described at the package editor steps (add/remove/change registry, files and folders…)
.
Add New Application
Add New application is actually pretty similar to Update Application in Existing Package. The only difference is that, after the installation the sequencer will also look for new shortcuts and add those to the package. But all the steps are exactly the same.
.
.
19. Migration from App-V 4.6 to App-V 5
To migrate a package from App-V 4.6 to App-V 5, new PowerShell CmdLets are available.
Be careful, those operations must be done with PowerShell 32-Bit (Migration using PowerShell 64-Bit will fail…).
Migration Process.
- Launch PowerShell 32-Bit
- Import App-V Module using this command:

.
- Check the convertibility of the package using this command:

That command generates a report about the convertibility of the package (It detects for example “Script” and “Registry” tags which are not converted…)
.
- Migrate the package using this command:

The new package is created in the destination folder. That operation is very fast, the new package is generated in a few seconds.