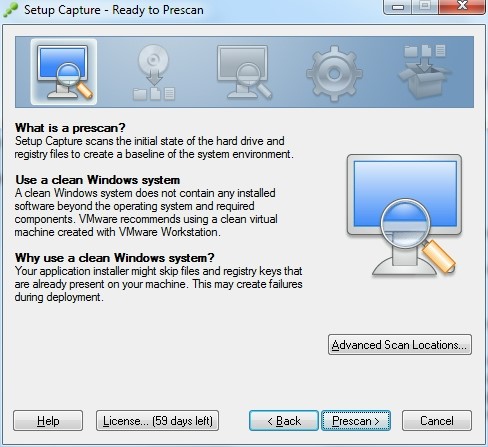
1. Create a System Image Before the Application Installation
The Setup Capture wizard starts the capture process by scanning the system to assess the environment and create a baseline system image.
Therefore, a clean Windows machine must be used to avoid the application installer to skip files and registry keys already present on the machine.
Create a system image before the application installation
- Build a clean machine using the client corporate image and install ThinApp (a virtual clean machine can also be used)
- Download the application to capture and copy it to the clean machine.
- Close any applications that might change the file system during the capture process.
- From the desktop, select Start > Programs > VMware > ThinApp Setup Capture.
- (Optional) In the Ready to Prescan dialog box, click Advanced Scan Locations to select the drives and registry hives to scan. Another location than the C:\ drive might be scanned if application is installed in a different drive. In rare cases, you might want to avoid scanning a registry hive if you know that the application installer does not modify the registry.
- Click Prescan to establish a baseline system image of the hard drive and registry files.
.
.
.
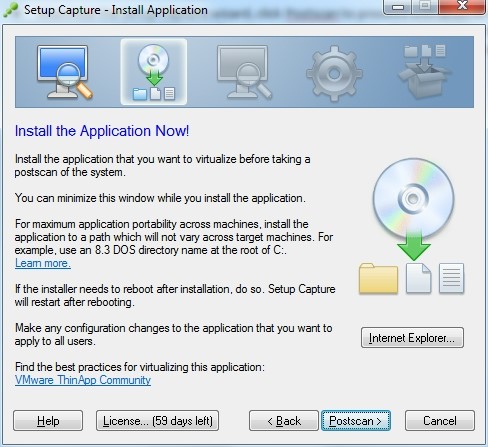
2. Rescan the System with the Installed Application
You can install the application to virtualize before the Setup Capture wizard rescans the system and assess changes from the initial system image.
Install the application and rescan the system
- When the Install Application page appears, minimize the Setup Capture wizard and install the applications to capture. If the application needs to restart after the installation, restart the system, the process restarts the Setup Capture wizard.
- (Optional) If you are capturing Internet Explorer, in the Install Application page, click Internet Explorer, to complete additional steps before installing the browser.
- (Optional) Make any necessary configuration changes to comply with your company policies.
- (Optional) Start the application and respond to any messages for information before you continue with the Setup Capture wizard. If you do not respond to any messages at this time, each user who uses the application must do so during the initial start.
- Close the application.
- Maximize the Setup Capture wizard, click Postscan to proceed with another scan of the computer, and click OK to confirm the postscan operation. ThinApp stores the differences between the first baseline image and this image in a virtual file system and virtual registry.
.
.
.
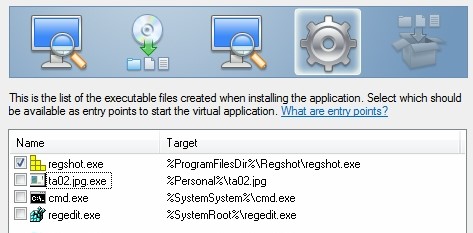
3. Defining Entry Points as Shortcuts into the Virtual Environment
Entry points are the executable files that act as shortcuts into the virtual environment and start the virtual application. The entry points you can choose from depend on the executable files that your captured application creates during installation.
For example, if you install Microsoft Office, you can select entry points for Microsoft Word, Microsoft Excel, and other applications that are installed during a Microsoft Office installation.
During the build process that occurs at the end of the Setup Capture wizard, ThinApp generates one executable file for each selected entry point. If you deploy the application as an MSI file or use the thinreg.exe utility, the desktop and Start menu shortcuts created on user desktops point to these entry points.
Entry Points for Troubleshooting
ThinApp provides entry points to troubleshoot your environment.
Debugging an application might involve the following entry points:
- cmd.exe – Starts a command prompt in a virtual context (to view the virtual file system).
- regedit.exe – Starts the registry editor in a virtual context (to view the virtual registry).
- iexplore.exe – Starts iexplore.exe in a virtual context (to test virtualized ActiveX controls).
Entry points start native executable files in a virtual context. Entry points do not create virtual packages of cmd.exe, regedit.exe, or iexplore.exe.
If you cannot predict the need for debugging or troubleshooting the environment, you can use the Disabled parameter in the Package.ini file at a later time to activate these entry points.
Set entry points in the Setup Capture wizard
- On the Entry Points page, select the check boxes for user-accessible entry points.
- (Optional) To debug your environment, select Show entry points used for debugging check box to display the iexplore.exe, regedit.exe, and cmd.exe troubleshooting options.
.
.
.
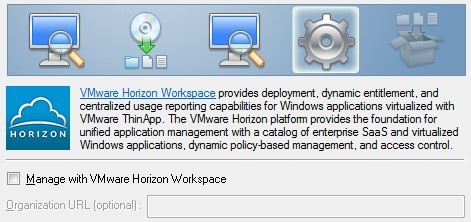
4. Manage with VMware Horizon Application Manager
You can use VMware Horizon Application Manager to manage the deployment and entitlement of ThinApp packages.
Usually, that option is not used; clients prefer tools like LANDesk or SCCM
.
.
.
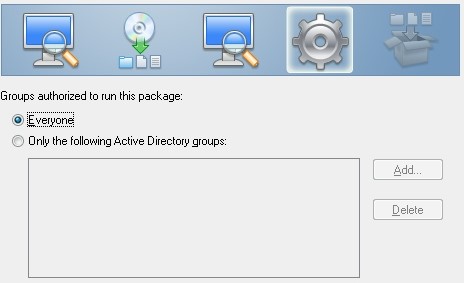
5. Set User Groups
ThinApp can use Active Directory groups to authorize access to the virtual application. You can restrict access to an application to ensure that users do not pass it to unauthorized users.
Set user groups in the Setup Capture wizard
- Select Everyone, or select Only the following Active Directory groups and click Add to specify Active Directory object and location information
- (Optional) Change the message that appears for users that ThinApp cannot authorize.
.
.
.
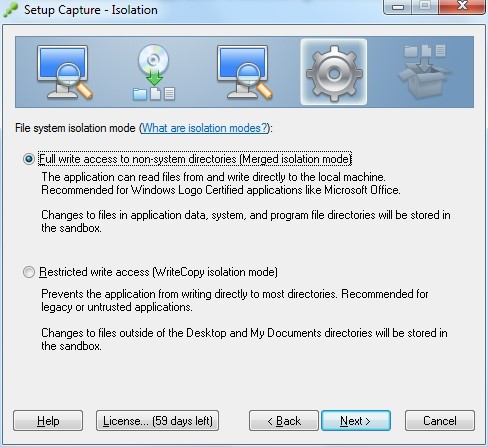
6. Defining Isolation Modes for the Physical File System
Isolation modes determine the level of read and write access to the native file system outside of the virtual environment. You might adjust isolation mode settings depending on the application and the requirements to protect the physical system from changes.
The selection of isolation modes in the capture process determines the value of the DirectoryIsolationMode parameter in the Package.ini file. This parameter controls the default isolation mode for the files created by the virtual application except when you specify a different isolation mode in the ##Attributes.ini file for an individual directory.
The selection of a directory isolation mode does not affect the following areas:
- ThinApp treats write operations to network drives according to the SandboxNetworkDrives parameter in the Package.ini file. This parameter has a default value that directs write operations to the physical drive.
- ThinApp treats write operations to removable disks according to the SandboxRemovableDisk parameter in the Package.ini file. This parameter has a default value that directs write operations to the physical drive.
- If you save documents to the desktop or My Documents folder, ThinApp saves the documents to the physical system. It sets the isolation mode in the ##Attributes.ini files in %Personal% and %Desktop% to Merged even when you select WriteCopy isolation mode.
Applying Merged Isolation Mode for Modifications Outside the Package
With Merged isolation mode, applications can read and modify elements on the physical file system outside of the virtual package. Some applications rely on reading DLLs and registry information in the local system image.
The advantage of using Merged mode is that documents that users save appear on the physical system in the location that users expect, instead of in the sandbox. The disadvantage is that this mode might clutter the system image.
When you select Merged isolation, ThinApp completes the following operations:
- Sets the DirectoryIsolationMode parameter in the Package.ini file to Merged.
- Sets up exceptions that apply WriteCopy isolation to the following directories and their subdirectories:
- %AppData%
- %Common AppData%
- %Local AppData%
- %Program Files Common%
- %ProgramFilesDir%
- %SystemRoot%
- %SystemSystem%
- Between the prescan and postscan capture operations, assigns Full isolation mode to any directories that the application creates during the installation.
Applying WriteCopy Isolation Mode to Prevent Modifications Outside of the Package
With WriteCopy isolation mode, ThinApp can intercept write operations and redirect them to the sandbox. WriteCopy isolation mode can be used for legacy or untrusted applications.
Although this mode might make it difficult to find user data files that reside in the sandbox instead of the physical system, this mode is useful for locked down desktops where you want to prevent users from affecting the local file system.
When you select WriteCopy isolation, ThinApp completes a number of operations:
- Sets the DirectoryIsolationMode parameter in the Package.ini file to WriteCopy.
- Sets up exceptions that apply Merged isolation to these directories
- %Personal%
- %Desktop%
- %SystemSystem%\spool
- Between the prescan and postscan capture operations, assigns Full isolation mode to any directories that the application creates during the installation.
.
.
.
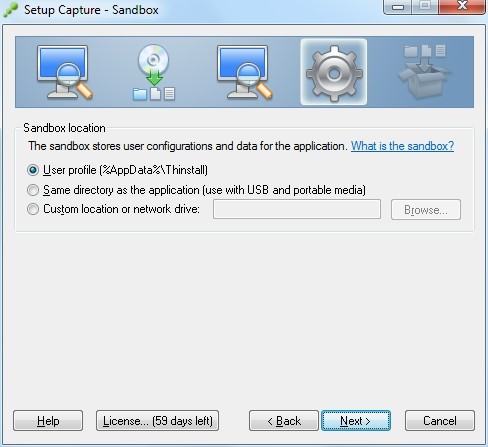
7. Storing Application Changes in the Sandbox
The sandbox is the directory where all changes that the captured application makes are stored.
The sandbox is runtime modification storage and is not a cache. The next time you open the application; those changes are incorporated from the sandbox.
When you delete the sandbox directory, the application reverts to its captured state. You might delete a sandbox when an application has a problem and you want to revert the application back to the working original state.
You can deploy the sandbox to:
- A local user machine : If you deploy the sandbox to a local machine, use the user’s profile as the sandbox location. The user’s profile is the default location because of the write access.
- A mobile USB device : A portable device location is useful to keep the sandbox data on the device where the application resides.
- A network location : A network location is useful for backing up the sandbox and for users who log in to any computer and keep their application settings. Use the absolute path to the location.
.
.
.
8. Send Anonymous Statistics to VMware
To improve ThinApp support for applications, VMware uses the capture process to confirm whether to collect anonymous data about deployed ThinApp packages.
The data includes the application start time, total running time, and number of runs for the application.
.
![]()
.
.
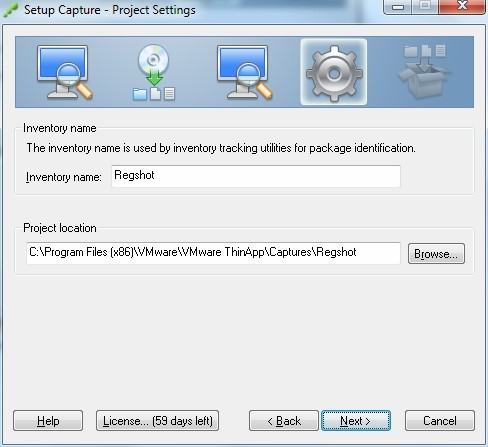
9. Customize ThinApp Project Settings
Setting up the project involves determining the inventory name and the project location.
- The inventory name facilitates internal tracking of the application and determines the default project directory name. The inventory name appears in the Add / Remove Programs dialog box for Windows.
- Change the directory where you want to save the ThinApp project.
.
.
.
10. Customize Package Settings
The package is built from the project files, it’s a .exe or .msi file used to run or deploy an application.
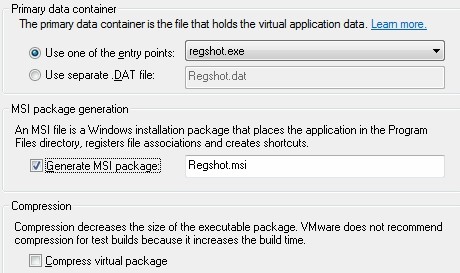
Defining the Primary Data Container
The primary data container is the main virtual application file that includes the ThinApp runtime and the read-only virtual file system and virtual registry. It is a .exe or a .dat file.
To identify the primary data container after you capture an application, check the ReadOnlyData parameter in the Package.ini file.
- If the size of the primary container is smaller than 200MB, ThinApp creates a .exe file as the primary container. If the size of the primary container is larger than 200MB, ThinApp creates a separate.dat file as the primary container.
- If you select a .exe file to override the default .dat file when the size of the primary container is between 200MB and 1.5GB, ignore the generated warning. Selecting a .exe file enables all applications to work properly but might prevent the proper display of icons.
- If you cannot select a primary data container, type a primary data container name to generate a .dat file.
Generating MSI Packages in the Capture Process
You can capture an application and deploy it as an MSI Windows installation package. The MSI installation places the application in the C:\Program Files directory.MSI packages automate the process of registering file-type associations, registering desktop and Start menu shortcuts, and displaying control panel extensions.
Compressing Packages in the Capture Process
Compressing a package in the capture process decreases the size of an executable package but does not affect MSI packages. Compression can reduce the on-disk storage requirement by 50 percent but slows the application performance when ThinApp uncompresses initial blocks.
.
.
.
11. Save Projects Files
By clicking the Save button, the Setup Capture tool create projects files before creating the package.
It is preferable to save that project files before creating the package. Saving the projects files allows using them later if you want to modify the package (for troubleshooting for example).
.
.
12. Build Virtual Application
You can adjust project files and build the application for deployment.
- Edit Package.ini allows modifying application parameters for the entire package.
- Open project folder allows browsing ThinApp project files in Windows Explorer.
Click Build to build an executable package or MSI package containing the files you installed.
.
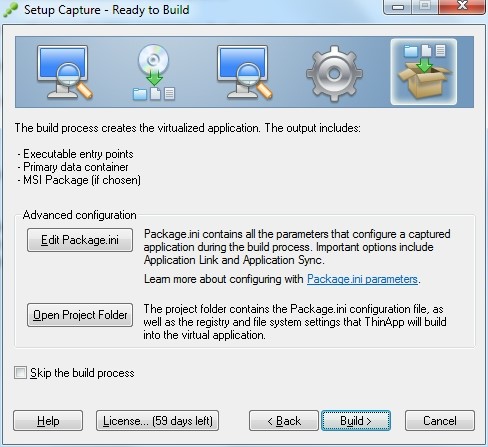
The package is created in the bin folder.
You can rebuild the package at any time to make changes with the build.bat file in the virtual application folder.
.
.
Appendix 1: The Package.ini File
You can modify the Package.ini file to update the overall package. The file resides in the captured application folder. The following parameters are a few examples of settings that you might modify:
- DirectoryIsolationMode – Sets the isolation mode to Merged, WriteCopy, or Full.
- Merged: Applications can read and modify elements on the physical file system outside of the virtual package.
- WriteCopy: ThinApp intercepts write operations and redirect them to the sandbox
- Full : ThinApp blocks visibility to system elements outside the virtual application package. This mode restricts any changes to files or registry keys to the sandbox and ensures that no interaction exists with the environment outside the virtual application package. Full isolation is not advised in Package.ini file because that mode blocks the ability to detect and load system DLLs. You can use Full isolation mode as an override mechanism in the ##Attributes.ini files.
- RegistryIsolationMode – Sets the isolation mode to Merged, WriteCopy, or Full for registry. ThinApp sets the initial registry isolation mode to WriteCopy. That parameter is not included by default in the Package.ini file but can be added in the [Isolation] section. The parameter is not included in the Package.ini file because it’s not advised to set it to Merged or Full. Exceptions can be set in the HKEY_LOCAL_MACHINE.txt and HKEY_CURRENT_USER.txt files.
- FileTypes – Lists file extensions to be associated with an executable file. It’s possible either to add or remove extension files by listing them in the Package.ini file.
- Protocols – Same as FileTypes, but for associated protocols
- ExcludePattern – Allows excluding files or directories during the application build process. You must add a [FileList] heading before this parameter entry (see Package.ini Reference.pdf)
- Icon – Specifies the icon file to associate with a generated executable file. It’s possible to set a specific icon using a .exe file or .ico file (see Package.ini Reference.pdf)
- RetainAllIcons – keeps all of the original icons of the executable file
- AccessDeniedMsg – Contains an error message to display to users who do not have permission to run a package. That parameter is located under [BuildOptions] section. (see Package.ini Reference.pdf)
- PermittedGroups – Restricts use of an application package to a specific set of Active Directory users. That parameter is located under [BuildOptions] section. (see Package.ini Reference.pdf)
- UACRequestedPrivilegesLevel – Specifies privileges for programs requiring UAC information. If you do not specify privileges, ThinApp does not assign a default value but operates according to the asInvoker setting. That parameter is located under [BuildOptions] section. (see Package.ini Reference.pdf). You can use the following values to specify privileges:
- asInvoker (uses the user profile)
- requireAdministrator
- highestAvailable (uses the highest available privilege that can avoid the UAC)
- DisableTracing – Block standard .trace file generation to hide the application history
- LogPath – Sets the location to store .trace files during logging activity
- Version.XXXX – Overrides application version strings, or adds new version strings in the Version tab of Windows properties.
- Shortcuts – Lists the locations where the thinreg.exe utility creates a shortcut to a virtual application. If you add shortcut locations, use semicolons to separate the entries.
- InventoryName – Allows to change the inventory name of the package
- SandboxNetworkDrives – Specifies whether to redirect write operations on the network share to the sandbox.
- COM objects and DLL can also be managed using parameters (see Package.ini Reference.pdf).
- Virtual software dependencies can be managed using the Application utility (see Package.ini Reference.pdf).
- MSI settings can be specified with the MSI utility. It’s possible to specify icon in add / remove programs, the MSI name, the AllUser setting, manufacturer, InstallDir, ProductCode, ProductVersion… (see Package.ini Reference.pdf)
- Sandbox settings can also be changed using the Sandbox utility (see Package.ini Reference.pdf)
- DisableCutPaste – Disable the cut and paste option in the ThinApp application
- LoadDotNetFromSystem – Specifies that the ThinApp application must use the .NET installation that is present in the user’s system, not the .NET installation that is in the ThinApp application.
- StatusbarDisplayName – Displays the splash screen’s title in the status bar of the ThinApp application start dialog box. You can modify this value to display different titles in the status bar.
Delete or change the value of the parameter and save the file
Double-click the build.bat file in the captured application folder to rebuild the application package.
For more details about Package.ini file parameters, see Package.ini Reference.pdf
.
.
Appendix 2: Prerequisites Management
Application Link is a feature that connects dependent application packages at runtime. This allows the administrator to build relationships between packages without using Setup Capture to package all needed components into a single package. Component packages are often more efficiently packaged, deployed, and updated separately.
Create links between packages for the following scenarios:
- Link runtime components, such as .NET, JRE, or ODBC drivers, with dependent applications. For example, you can link .NET to an application even if the local machine for the application does not allow for the installation of .NET or already has a different version of .NET.
- Package and deploy application-specific components and plug-ins separately from the base application. For example, you might separate Adobe Flash Player or Adobe Reader from a base Firefox application and link the components.
Practice Creating an Application Link between Packages
Follow the process below to set up the link.
- Create the package with the component that you want to link, build the package as an EXE, and then rename the file to something other than an .exe extension to prevent users from running that package directly. A .dat extension will be used in this example: AdobeFlashPlayer.dat
- Create the capture of the originating package with the component already installed, for example, Mozilla Firefox.
- In the originating package, Mozilla Firefox, open the Package.ini file and set the RequiredAppLinks parameter as follows in the [Build Options] section: RequiredAppLinks=AdobeFlashPlayer.dat
- Place both packages in the same directory, locally or on the central file share.
- Launch the Mozilla Firefox application and then navigate to the Adobe site to verify Flash functionality.
Note: Application Links can be specified as Required or Optional in Package.ini. If specified as Required, the primary application will not launch if it cannot connect to the linked application.
.
.
Appendix 3: Centralized or De-Centralized Deployment
The determination of centralized versus de-centralized deployment depends on the execution mode of the package.
One of the decision points for virtualizing applications with VMware ThinApp is to choose which execution, or delivery, mode is appropriate for users, groups, and applications. There are two primary modes of delivery:
- Streaming mode
- Deployed mode¨
Streaming Execution Mode
Streaming execution mode allows the application to be centrally stored and accessed by multiple users. It is a one-to-many model that provides centralized deployment and update of the application package to multiple end users for execution via a Windows desktop shortcut.
The streaming mode of execution is often the best option for environments that are centralized and where desktops are always online. In streaming mode, the application is launched from a shortcut on the desktop or Start menu and then run from a remote location. The virtualized application is streamed into memory as the application requests files and registry settings.
The user must always have access to the central network location where the ThinApp streaming packages reside.
The storage location that hosts the applications must be highly available. The path through the network between the client device and the central network location must be robust.
Deployed Execution Mode
Deployed execution mode application packages are first deployed to the end user’s system, and then accessed from the local device. Users execute the application from an application package that is local, which allows for offline application use.
The actual location of the package can be on the local file system or a USB device. In this distributed model, each client device receives the package locally and therefore can run the application regardless of network connectivity.
Integrate the delivery of packages, which can be large .exe or .msi files, with your existing organizational process. An existing process, such as Active Directory publishing via Group Policy, will have an already established support structure and administration workflow. You can use Group Policy to deploy software to groups, organizational units, or individuals.
After the application package is delivered, application performance and availability is not subject to network or storage dependencies.
.
.
Appendix 4: Isolation parameters
For the virtualized application to read files and registry keys and write their virtual equivalent in the package, the right isolation mode must be implemented.
ThinApp configures the isolation mode automatically but it can be specified manually by the packager.
3 distinct isolation modes:
- Full: If a system file or a registry key exists on both physical system and in the package, only the element in the package can be read, and writing is done in the sandbox.
- WriteCopy: If a system file or a registry key exists on both physical system and in the package, the element in the system can be read but writing modifications are stored in the sandbox.
- Merged: If a system file or a registry key exists on both physical system and in the package, the virtualized application can read and write the element in the system.
The global isolation mode can be set within a parameter in the package.ini file :
[Isolation]
DirectoryIsolationMode=Merged
The isolation mode can also be set individually for all folders and subfolders within the ##Attributes.ini file in all of them.
Regarding registry keys, the isolation mode can be set individually for each key at the start of the corresponding line in the registry text files at the root of the project.
.
.
Appendix 5: Modifying a package using Sbmerge.exe
Sbmerge.exe is useful to add modifications to an existing package without making a new capture.
To modify an existing package:
- Launch the ThinApp package
- Apply the modifications directly (they are then stored in the sandbox)
- Apply those modifications in the project folder using the following command: Sbmerge.exe Apply –ProjectDir <project_path> -SandboxDir <sandbox_path>
- Then rebuild to generate a new package including the modification
.
.
Appendix 6: DLL_Dump.exe
DLL_Dump.exe lists all running ThinApp packages and shows for each of them:
- DLL loaded by the application inside the package
- System DLL loaded by Windows.
This can be helpful for troubleshooting…